Offerings & Catalog
Your funnel doesn’t hardcode prices. A page references a slot — a stable local name like plan — and the platform resolves that slot to a real offering, and the offering to a real provider price, at render time. This page covers the whole chain: connecting a payment store, modelling your catalog of offerings, wiring a slot end-to-end, and granting entitlements on the price a customer actually buys.
Prices live in your catalog, never in funnel.ts. Swapping what a slot
sells is a catalog edit — you never touch page code to change an offer. See
Offerings & Checkout for the page-side hooks.
Connect a payment store
A store is a connection to a payment provider that owns the actual charges. Everything downstream — imported prices, catalog bindings, live checkout — hangs off a connected, activated store.
Open Stores, then Add Store. On an empty project you’ll see No stores yet with Add Your First Store. The provider chooser offers five cards:
- Stripe — “Payment processing platform — you are the merchant of record.”
- Paddle — “Merchant of Record — Paddle handles tax, billing, and compliance.”
- Whop — a commerce platform that takes the payment itself and can collect and remit sales tax and VAT for you.
- SolidGate — a processor you settle through that also routes charges across other acquirers.
- Primer — an orchestration layer that routes each charge to the processors you already hold.
Stripe is the primary, fully-supported path. Document your production funnels against it.
Which provider you pick decides two things you’ll feel later: whether you or the provider is the seller — and so who owns tax — and which checkout surfaces your paywall can use. See Offerings & Checkout for the page-side effect.
Stripe (recommended: the Stripe App)
The Stripe setup screen offers two paths. The recommended one is Install Stripe App (badge “Recommended”):
Stripe will generate a restricted API key with only the permissions Appfunnel needs — no full account access required.
Installing the app mints a scoped restricted key (rk_...) — Appfunnel never sees your full account. The alternative is entering API Keys manually: a Publishable Key (pk_test_...) and a Secret Key or Restricted Key (sk_test_... or rk_test_...).
Test vs live is inferred from your keys — you never pick a mode.
pk_test_/sk_test_ → Test mode (amber Test mode keys detected);
pk_live_/sk_live_ → Live mode (emerald Live mode keys detected). The
server confirms this against Stripe (isTestMode = !accountInfo.livemode).
Keys are encrypted at rest.
Client-side validation rejects mismatched or malformed keys before submit, verbatim:
Please fill in both API keys.Invalid key format. Publishable key should start with pk_test_ or pk_live_. Secret/restricted key should start with sk_ or rk_.Key mode mismatch. Both keys must be either test or live mode.
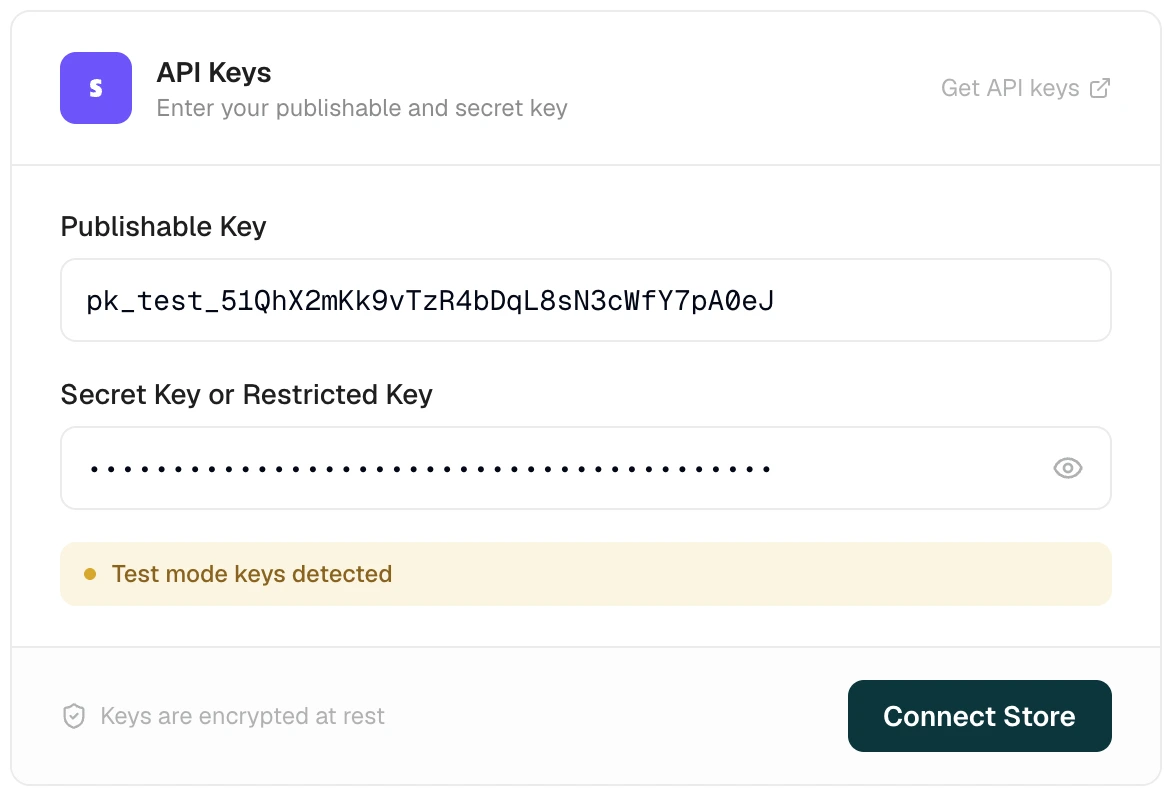
Webhook setup depends on your key type. A full secret key (sk_...) lets the API auto-create the Stripe webhook endpoint for you. A restricted key (rk_...) can’t, so you get a 3-step manual flow — Set Up Webhook: add the copyable endpoint URL to Stripe, subscribe it to the 10 payment events Appfunnel needs (setup_intent.succeeded, payment_intent.succeeded, payment_intent.payment_failed, checkout.session.completed, customer.subscription.created/updated/deleted, invoice.paid, invoice.payment_failed, charge.refunded), then paste the signing secret and hit Complete Setup. A bad secret is rejected with Invalid webhook secret. It should start with whsec_.
If webhook creation fails, the store is deleted and the error rethrown — there are no half-connected stores. When it succeeds you’ll see Store connected successfully: “Webhook endpoint created and subscribed to payment events.”
Paddle
Alpha Feature. “Paddle integration is currently in alpha and may have limitations or unexpected behavior. We strongly recommend contacting support before using it in production.” Everything below describes Paddle; treat Stripe as the supported path.
Paddle needs an API Key and a Client-side Token (found in Paddle Dashboard → Developer Tools → Authentication). Sandbox vs production is detected the same way Stripe’s mode is: a pdl_sdbx_ key or test_ token → Sandbox environment detected, otherwise Production environment detected. The webhook is auto-configured, with the same delete-on-failure rollback as Stripe.
As a Merchant of Record, Paddle always collects the card in its own frame —
so payment="card" isn’t available on a Paddle funnel. The default
(payment="auto") works on every provider, which is what keeps a paywall
portable. See Offerings & Checkout.
Whop, SolidGate and Primer
Each connects the same way — Stores → Add Store, pick the provider, paste the credentials from that provider’s own dashboard — and behaves identically from there on: prices import into your catalog, offerings bind to them, and the webhook that flips the store to Activated works as it does for Stripe.
What differs is who is selling and how the charge is routed:
- Whop takes the payment itself, so it collects the card in its own frame — the same constraint Paddle has, and for the same reason. Which of Whop’s tax modes you run (Whop remits, you remit, or you handle tax yourself) is a setting on Whop’s side, not something Appfunnel decides.
- SolidGate settles to your own account, so tax stays yours. It also routes across other acquirers, which means a declined charge can be re-attempted somewhere else.
- Primer doesn’t process the charge at all — it routes it to a processor you already hold, so you need at least one connected on Primer’s side before a Primer store is useful. Money settles wherever it settled before.
Pending → Activated
A freshly connected store shows a Pending badge. It flips to Activated on the first webhook event it receives — a real payment, or the provider’s initial confirmation. Until then Appfunnel knows the connection exists but hasn’t heard back from the provider. An amber Test Mode badge marks test-mode stores regardless of activation.
Import prices
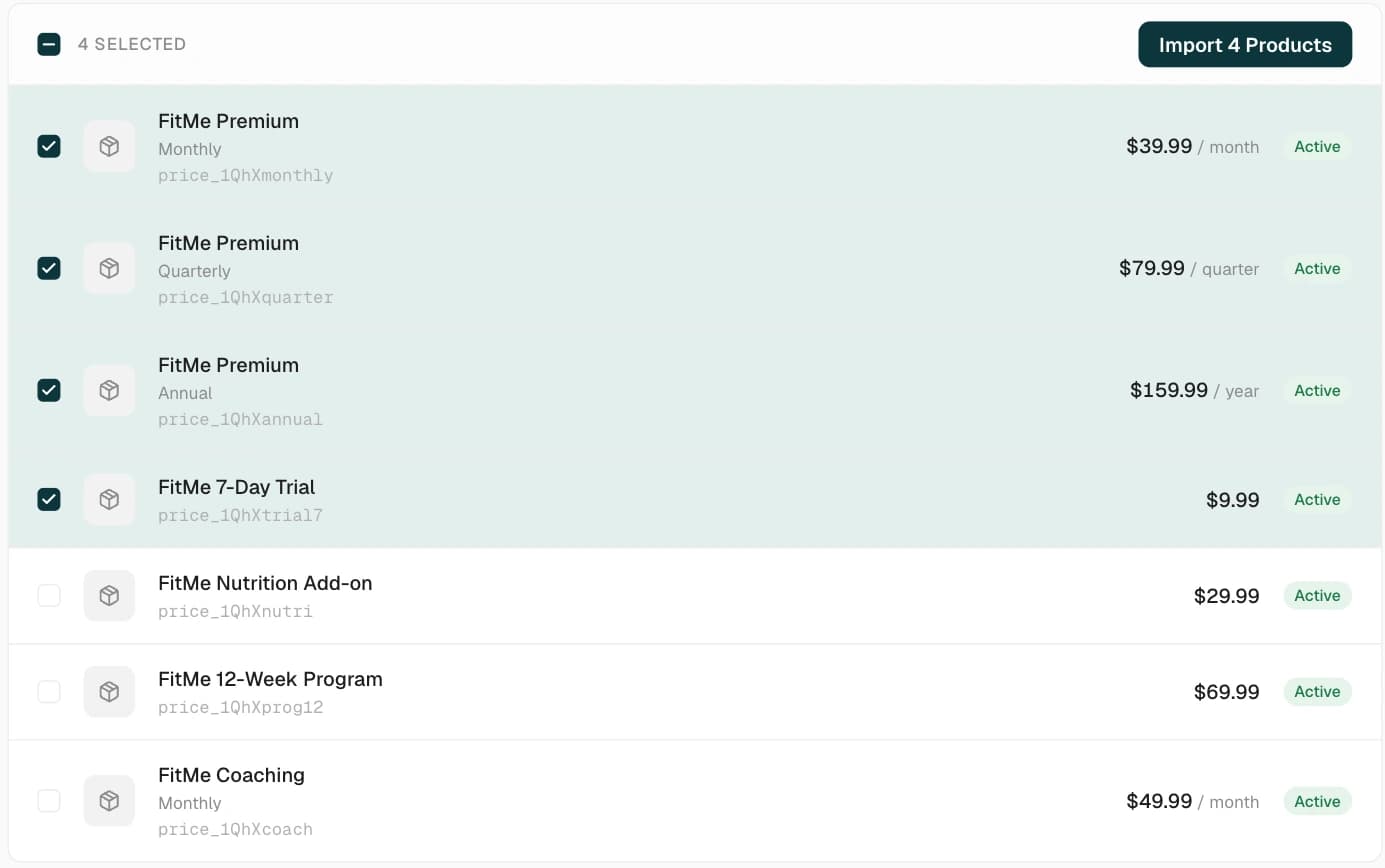
Connecting a store doesn’t pull your prices automatically. On the store’s import screen, Import Prices lists every price Appfunnel found; check the ones you want (each shows name, price id, amount/interval, a trial badge, and Active/Inactive), then Import N Prices. Imported prices appear under Store prices, and re-syncing a store toasts Prices synced successfully.
Each imported price is a StorePrice — the actual, priced SKU a customer buys. It’s the object your offerings bind to, and — as you’ll see below — the object that grants entitlements.
The catalog model
Imported store prices are raw provider objects. The catalog is the layer on top: stable offerings your funnels reference by key, each bound to the right store price per environment. Open Catalog (tabs Offerings / Entitlements).
Catalog is a newer surface and its dashboard nav is currently limited to select projects. The model below is stable and applies wherever it’s available.
Offerings
An offering is the funnel-facing merchandising handle — a stable key your funnels reference, plus the metadata that says how it’s sold. It is:
| Field | Meaning |
|---|---|
key | Stable identity your funnel source references verbatim (offering('pro_monthly')). Up to 64 letters, numbers, dots, hyphens and underscores, starting and ending with a letter or number — so it can mirror a store product id like com.acme.Pro.Monthly. Immutable. |
name | Human label (1–64 chars). |
kind | SUBSCRIPTION or ONE_TIME. Immutable. |
provider | STRIPE, PADDLE, WHOP, SOLIDGATE or PRIMER. Immutable. |
key, kind, and provider are frozen once created — to change any of them you create a new offering instead. That’s deliberate: your funnel source and every release you’ve published reference the key verbatim, so it can never shift under them. The empty state reads: Create an offering, then bind a live and a test price so your funnels can reference it by key.
An offering is a merchandising handle, not a price and not a grant. It carries no entitlements of its own — access is granted by the store price it binds (see Entitlements below).
Prices as bindings
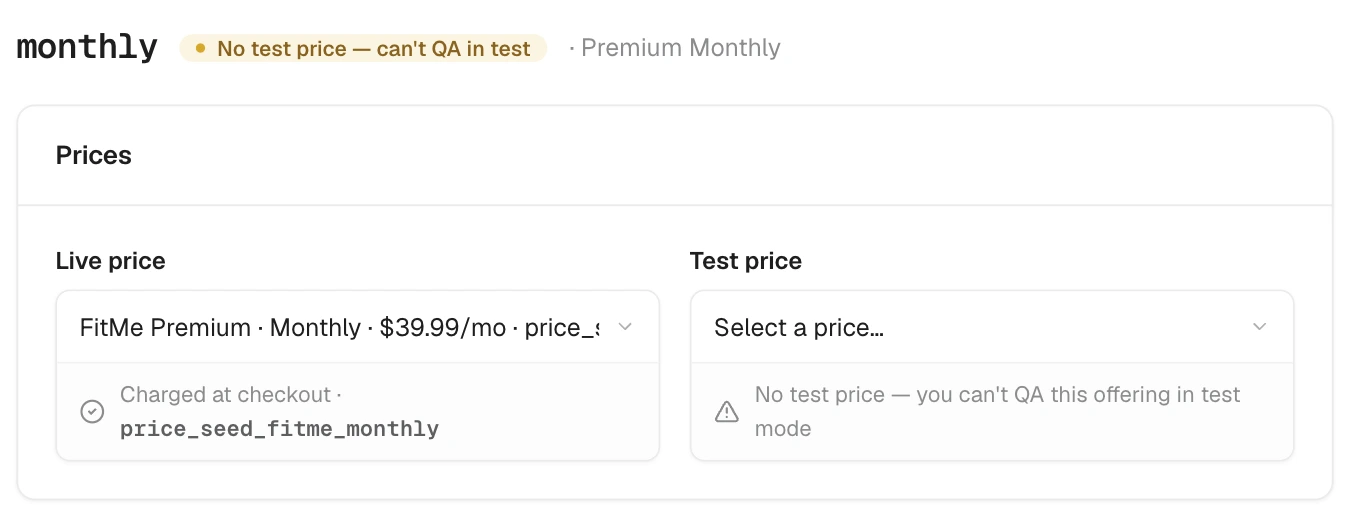
An offering doesn’t hold a price — it holds bindings. A binding maps (environment, role) to one imported storePriceId:
- environment:
LIVEorTEST - role:
BASE(the normal price) orTRIAL(the trial/intro fee)
On the offering detail you set a Live price and a Test price (the BASE bindings), and — for subscription offerings with a trial enabled — a Trial fee — live and Trial fee — test (the TRIAL bindings). Miss the test binding and you’ll see No test price — you can’t QA this offering in test mode.
One store price per offering per environment: an offering binds a single Live price and a single Test price. Multi-price packages — several prices under one offering — aren’t modelled yet.
Entitlements
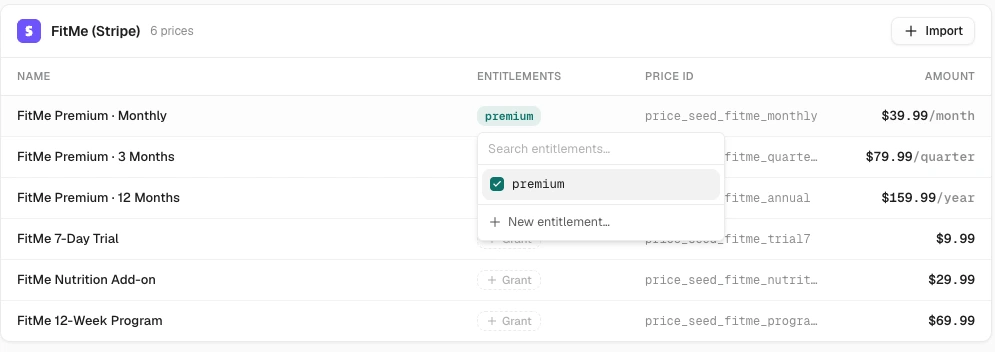
Entitlements are the access strings your app checks to unlock features — premium. They’re defined once per project (the Entitlements tab), then granted by a store price: the priced SKU a customer actually buys carries the set of entitlements that purchase confers.
This matches the RevenueCat mental model — the thing that unlocks access is the SKU you bought, not the merchandising offer it sat behind. An offering never grants access directly; it only resolves, per environment, to the price that does.
Grants are assigned per price, and Test and Live are independent. On the Prices tab, every price row has an Entitlements cell. The chips in it are the button: click them (or the dashed + Grant chip when the price grants nothing yet) and a searchable checkbox list opens, with a New entitlement… item at the bottom if the key you want doesn’t exist yet. Prices are grouped by the store they came from, so your test store and your live store are separate cards — assign premium on each one independently, because there’s no auto-sync between them. Grant it on the live price only and test buyers get nothing. This lets test and live diverge on purpose; the tradeoff is that you set the grant twice.
The same grant is editable from an offering’s detail page, under Access each price grants.
Access is computed on read, never stored on a customer: a subscription resolves to its store price, and that price’s granted entitlements are the customer’s access. Editing a price’s grant applies instantly — the next read reflects it. A price that grants no entitlements confers nothing.
The Entitlements tab is where you define the keys; its empty state: Entitlements are the access keys (like premium) your store prices grant. You can’t delete an entitlement that’s still granted by a price — you’ll get entitlement "{key}" is still granted by a store price, … — unassign it first.
Environment money-safety guards
The riskiest mistake in a payment funnel is charging a live card against a test price, or wiring a Stripe offering to a Paddle price. The catalog refuses these at binding time. When you bind a price to an offering, validateBindingTarget checks it resolves and matches, rejecting verbatim:
storePriceId does not resolve to a price in this projectprice belongs to a {STRIPE|PADDLE} store but the offering's provider is {provider}— the price’s store provider must match the offering’sprovider.price belongs to a {TEST|LIVE} store but the binding environment is {LIVE|TEST}— a test-store price can only fill a TEST binding; a live-store price only a LIVE binding.
Trial and entitlement edits carry their own guards (durationDays must be an integer between 1 and 365, too many entitlementIds (max 100 per price), and so on). Catalog edits apply directly — there’s no staging step — so the dashboard shows a client-side confirm listing which promoted funnels an edit affects.
The slot lifecycle, end-to-end
A slot travels from a declaration in funnel.ts, through the editor’s Offerings view, into your page code, and finally through the checks that run when you publish. Here’s the whole path.
1. Declare in funnel.ts
Slots live in defineFunnel’s offerings map. The default template seeds one, unassigned:
offerings: {
	plan: null
} // declared, UNASSIGNED — useOffering returns undefined
offerings: {
	plan: 'pro_monthly'
} // slot 'plan' sells offering 'pro_monthly'
null is a real, valid state: the slot exists but isn’t wired to an offering yet. You can declare a slot three ways — hand-edit funnel.ts, add one in the Offerings view, or ask the AI assistant.
The assistant’s assign_offering tool is the code-mod that writes the slot →
offering-key mapping into funnel.ts. It frames slots as “offers” and hides
offering keys from marketers, but under the hood it edits the same offerings
map you would by hand.
2. Assign in the Offerings view
The editor’s Offerings view (rail icon “Offerings”) is “Assign an offering to each offer your pages show.” It reconciles what’s declared in funnel.ts, what your pages actually use (a static scan of useOffering and the checkout components), what’s assigned, and whether the assigned offering resolves to real prices. Each offer row carries a status dot with exact copy:
| State | Dot | Meaning (verbatim) |
|---|---|---|
| healthy | green | ”Ready — an offering with a live price is assigned” |
| no-live | amber | ”Only has a test price — add a live price in Catalog before publishing.” |
| unassigned | amber | ”No offering yet — you can’t publish until you assign one.” |
| undeclared | red | ”A page shows this offer, but it isn’t set up yet.” |
| orphan | red | ”The assigned offering is no longer in your catalog — pick another.” |
| inert | gray | ”Not used by any page yet.” |
| unresolved | gray | ”Couldn’t load this offering’s prices.” |
Add an offer inline (placeholder “offer name, e.g. plan”; names must match /^[A-Za-z0-9][A-Za-z0-9._-]{0,63}$/, else Use letters, numbers, and . _ - only. or That offer already exists.). Click Assign to open the OfferingPicker and bind the slot to an offering; an empty catalog shows Your catalog is empty — create an offering to assign one. Reassigning changes what you sell without touching page code.
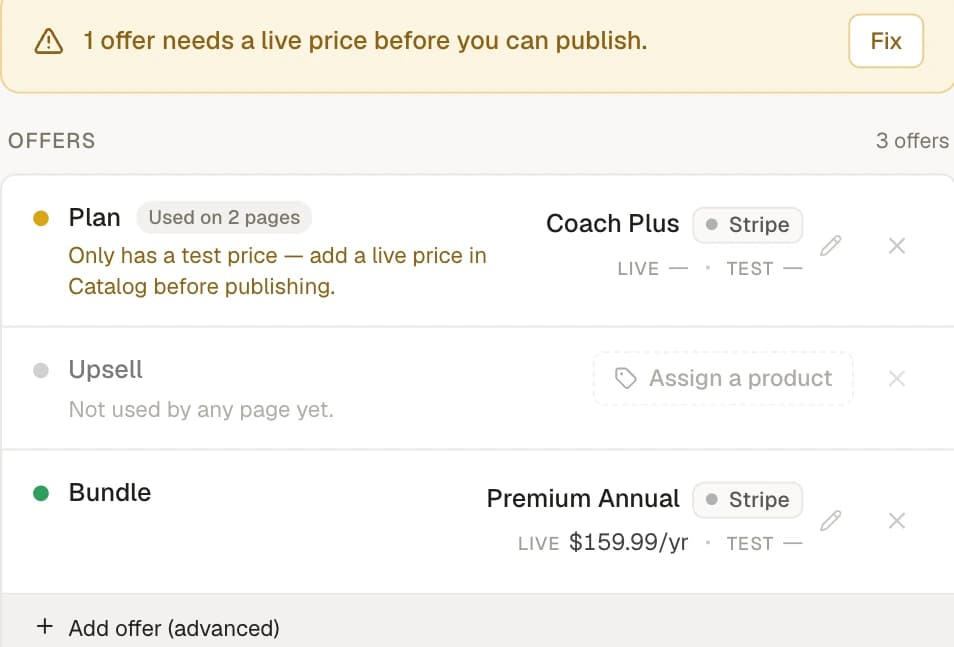
If funnel.ts has been hand-edited into a shape the editor can’t read back, the Offerings view goes read-only: This funnel’s config can’t be edited here — open the Code tab. Edit the offerings map directly in code.
3. Reference in pages
In a page, read the slot with useOffering and charge it with <Checkout>:
const offering = useOffering('plan')
// …
<Checkout offering="plan" />
An unassigned slot returns undefined from useOffering and <Checkout> renders a hint instead of a purchase. Appfunnel reads which slots your pages reference, so the Offerings view knows which slots are in use and publishing knows what to check. Full page-side API in Offerings & Checkout.
4. What blocks a publish
Two things catch a broken offering before it reaches live traffic.
While you edit, the editor’s Issues chip flags a page that references a slot you haven’t declared, and a declared slot with no offering assigned.
When you publish live, the publish is blocked — with a clear reason — for any of three problems:
- A slot is undeclared or unassigned. A page references a slot that isn’t in
funnel.ts, or a slot has no offering. Fix: declare the slot and assign it an offering in the Offerings view. - An assigned offering has no live price. It works in test (it has a test price) but can’t go live. Fix: open each named offering in Catalog and set its Live price — the same thing the Offerings view flags amber as “Only has a test price.”
- Mixed payment providers. A single funnel can’t sell offerings from two different payment providers. Fix: reassign the offending slots so every offering shares one provider.
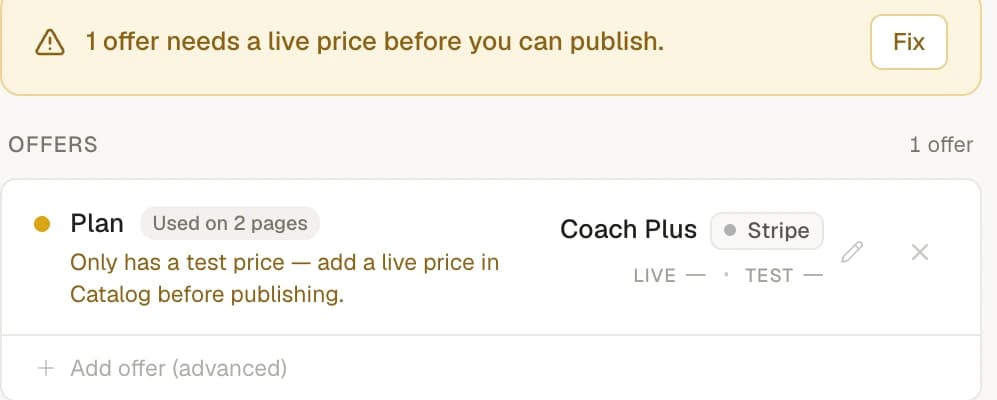
None of these blocks is a surprise if the Offerings view is all-green before you publish. Getting every offer row to the green “Ready” state checks the same conditions publishing does — so a green board means a clean publish.